HOW TO FRAME A BASEMENT WINDOW AROUND PLUMBING LINES
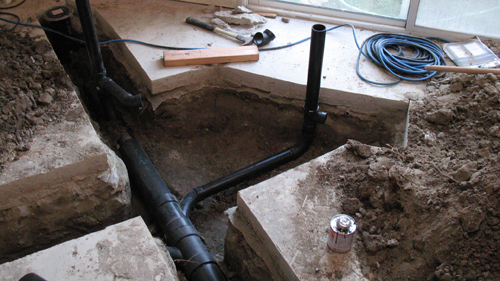
Framing a basement finished wall often presents layout puzzles, particularly when mechanical systems like waste lines or supply pipes run tight against the existing concrete masonry. This scenario becomes even more complex when the plumbing line intersects or runs directly adjacent to a basement window opening. Because these perimeter basement walls are typically non-bearing partitions, carpenters and remodelers have significantly more structural flexibility than they would with load-bearing assemblies. By implementing strategic framing adjustments, you can safely enclose the plumbing lines without sacrificing valuable square footage or blocking natural light.
ESTABLISHING THE WALL LAYOUT AND CLEARANCES
The critical first step when dealing with obstructions is establishing a precise layout line. Snap a chalk line on the concrete floor and mirror it onto the floor joists above to dictate the location of your bottom plate and top plate. Before anchoring these plates, measure the outermost projection of the plumbing pipe relative to the foundation wall. Your framing line must sit far enough forward to ensure that the entire pipe is completely recessed within the wall cavity. If any part of the pipe protrudes past the front face of the 2x4 studs, the drywall will bow, creating a permanent blemish in the finished space. Once clearances are verified, anchor your top and bottom plates and install the standard full-height wall studs flanking the window area.
FLAT-FRAMING TECHNIQUES AND HARDWARE CONNECTIONS
When a plumbing pipe runs directly behind a window jamb or header location, a traditional 2x4 stud installed on-edge (with the 3.5-inch depth facing inward) will often collide with the pipe. To circumvent this, you can turn the framing members flat, utilizing their 1.5-inch dimension for depth. For instance, you can attach a flat 2x4 spanning horizontally across the back of the wall studs, extending it past at least two full-height studs to tie the assembly together. If space is exceptionally tight, you can notch the back of the studs or substitute the 2x4 with a 1x4 wood furring strip or a strip of structural plywood, provided the pipe does not physically block the rough opening of the window.
To securely tie these flat-framed components to the vertical studs, standard toenailing is often insufficient due to the awkward angles and reduced wood thickness. Utilizing specialized metal connectors, such as Simpson Strong-Tie A35 framing clips or equivalent structural hardware, guarantees rigid, code-compliant joints. These clips allow you to screw or nail the horizontal window sills, headers, or flat blocking directly to the vertical framing members without splitting the wood or relying on weak connections.
MAXIMIZING FLEXIBILITY IN NON-BEARING PARTITIONS
It is important to emphasize that perimeter basement walls built inside a foundation are structurally non-bearing walls. They support no dead or live loads from the floors above. Because of this, International Residential Code (IRC) rules for stud modifications are far more relaxed than they are for load-bearing assemblies. You can safely space studs up to 24 inches on center, orient individual studs flat to clear pipes, and run horizontal blocking to bridge gaps where a vertical stud cannot be placed due to a large drain line.
If a thick waste stack prevents you from placing any wood framing directly behind it, you can run horizontal 2x4 lookouts between the adjacent full-height studs, leaving the space behind the pipe entirely open. While this floating assembly might feel slightly flexible during construction, the structural integrity increases exponentially once the gypsum board is installed. The drywall acts as a continuous diaphragm, locking the flat studs and horizontal blocking into a rigid, unified surface. If additional rigidity is desired before drywall, you can mechanically fasten blocking directly to the foundation wall. However, extreme care must be taken: use shallow masonry anchors to avoid drilling entirely through the foundation, which can compromise the exterior waterproofing system and invite water infiltration.
THREE KEY TIPS FOR FRAMING AROUND BASEMENT PLUMBING
VERIFY DEPTH CLEARANCES BEFORE ANCHORING PLATES
Always use a straightedge or plumb bob to check the thickest point of the plumbing line especially around hubs and fittings against your floor layout line. Ensure the entire pipe assembly sits at least 0.25 inches behind the face of the framing to prevent the plumbing from transferring vibrations to the finished drywall.
UTILIZE SPECIFIED STRUCTURAL HARDWARE FOR FLAT CONNECTIONS
When framing members are turned flat to bypass mechanical obstructions, traditional end-nailing or toenailing lacks sufficient holding power. Install structural framing connectors, like A35 clips, to mechanically tie horizontal sills and flat blocking to the main vertical studs, preventing wood splitting and joint failure.
PREVENT WATERPROOFING BREACHES WHEN ANCHORING TO FOUNDATIONS
If you choose to secure floating or flat framing members directly to the concrete or block foundation wall for extra rigidity, limit your drilling depth. Use short masonry fasteners and a drill stop to ensure you do not puncture the exterior moisture barrier or waterproofing membrane.
BONUS QUESTIONS AND ANSWERS
A smooth transition into frequently encountered basement framing challenges helps ensure a long-lasting, code-compliant installation.
QUESTION 1: Does the building code allow you to notch or drill studs in a non-bearing basement wall to clear plumbing pipes, and what are the specific structural limits?
ANSWER 1: Yes, the International Residential Code (IRC Section R602.6.1) allows for much larger modifications in non-bearing walls compared to load-bearing ones. In a non-bearing partition, any wood stud may be bored or drilled up to 60 percent of its width. Additionally, studs in non-bearing walls may be notched up to 40 percent of their width without any extra reinforcement. If you must cut further into a stud to pass a plumbing pipe, the code requires you to reinforce the weakened stud by doubling it up or installing an approved metal tie plate across the notch to restore lateral stability and provide a code-compliant nail-protection barrier for the pipe.
QUESTION 2: What are the IRC requirements for providing mechanical protection plates over plumbing lines within framed basement walls?
ANSWER 2: Per IRC Section P2603.2.1, if a plumbing pipe passes through a wood framing member (like a stud, plate, or sill) and the outer edge of the pipe is located less than 1.25 inches from the finish face of the framing, a steel shield plate must be installed. This plate must be made of minimum number 16-gage steel and must extend at least 2 inches above the sole plate and below the top plate. This structural reasoning ensures that drywalls screws or finish nails driven during the remodeling process cannot accidentally puncture the water supply or waste lines, preventing catastrophic hidden leaks inside the finished wall cavity.
QUESTION 3: How does the building code address the required clearance and accessibility for basement windows when framing finished walls around them?
ANSWER 3: When framing around an existing basement window, you must verify if the window is classified as an Emergency Escape and Rescue Opening under IRC Section R310. If the basement contains a sleeping room, or if this is the sole emergency exit for a habitable basement, the rough opening must provide a net clear opening of at least 5.7 square feet (or 5.0 square feet for grade-floor openings), with a minimum net clear opening height of 24 inches and width of 20 inches. Furthermore, the sill height cannot exceed 44 inches above the finished floor. Your finished wall framing, flat studs, and headers must never infringe upon these minimum dimensions or impede the full operation of the window sash.