Embarking on a bathroom remodeling project can be an intimidating venture, particularly for homeowners tackling it for the first time. The space involves complex plumbing, electrical, and moisture-control systems packed into a tight footprint. However, thorough planning and attention to detail will ensure a successful renovation. Here are five crucial guidelines to keep your bathroom remodel running smoothly, on budget, and up to standard.
Maintain Your Existing Layout
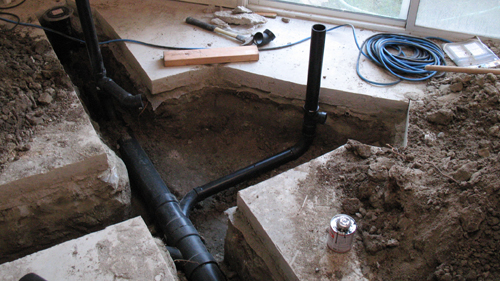
One of the most effective ways to manage costs during a bathroom remodel is to preserve the existing floor plan. Moving major plumbing fixtures, such as relocating a bathtub to where the toilet stands, requires re-routing water supply lines and drain-waste-vent (DWV) piping beneath the subfloor. This can drastically increase labor and structural modifications. Keep your original fixture layout intact wherever possible, and ensure all new fixtures accurately fit the rough-in dimensions of your space.
Prioritize Dust Control and Ventilation During Demolition
Demolition creates fine silica dust, plaster particles, and debris that pose significant respiratory risks. Before tearing out old tile, tubs, or drywall, set up proper safety measures. Wear a tight-fitting N95 or P100 respirator mask to protect your lungs. To prevent dust from settling across the rest of your home, establish negative air pressure by mounting an exhaust fan in an open bathroom window to draw dust directly outside.
Coordinate Fixture Finishes and Colors
When selecting new plumbing fixtures, maintain visual harmony. Mixing stark white porcelain fixtures with off-white or cream tones can make a newly renovated bathroom look mismatched and uncoordinated. Sticking with cohesive fixture colors and matching metal hardware finishes such as brushed nickel, matte black, or chrome creates a unified, professional design.
Select the Right Paint Finish and Base
Bathrooms are high-moisture environments, making paint selection critical for long-term durability. Avoid flat, matte, or eggshell paints on bathroom walls, as they absorb moisture and are prone to mold growth and water staining. Instead, opt for a semi-gloss sheen. Semi-gloss paints feature a higher resin count that creates a washable, moisture-resistant barrier. While oil-based paints offer high durability, water-based acrylic or latex semi-gloss formulations are far easier to apply, release significantly fewer volatile organic compounds (VOCs), and clean up easily with soap and water.
Educate Yourself or Hire a Licensed Professional
Whether you choose the DIY route or hire a general contractor, preparation is key. If hiring out, verify that the contractor holds an active license, carries proper liability and worker's compensation insurance, and offers verifiable local references. If you plan to handle the work yourself, invest time in researching local residential building codes, structural requirements, and proper waterproofing methods before starting.
By grounding your bathroom project in smart design choices and proper execution, you protect your investment and build a functional space that stands the test of time.
THREE KEY CONSTRUCTION TIPS:
Seal All Drywall Penetrations: Always seal gaps around plumbing stub-outs, light fixtures, and electrical boxes behind the vanity using mold-resistant caulk or expanding foam. Unsealed penetrations allow warm, humid bathroom air to infiltrate wall cavities, causing concealed condensation, timber decay, and mold growth.
Verify Subfloor Deflection Before Tiling: Standard wood subfloors must meet a minimum deflection rating of L/360 for ceramic tile and L/720 for natural stone under full design loads. Installing tile over a flexible subfloor causes grout joints to crack and tiles to delaminate. Always check joist span ratings and reinforce subflooring with an appropriate cement backer board or uncoupling membrane before laying tile.
Maintain Minimum Clearances Around Fixtures: Ensure your layout complies with standard spatial requirements. The International Residential Code (IRC) requires a minimum of 21 inches of clear space in front of toilets, sinks, and tubs, though 24 to 30 inches is recommended for optimal comfort and accessibility.
BONUS QUESTIONS AND ANSWERS:
Question: What is the minimum subfloor thickness and blocking required under tile to prevent future cracking and rot in a bathroom?
Transition: After resolving any underlying joist issues, turning your attention to the subfloor assembly ensures your new finish flooring stays rigid and water-tight for decades.
Answer: Under the International Residential Code (Section R503.2) and Tile Council of North America (TCNA) standards, a single layer of standard 5/8-inch or 3/4-inch tongue-and-groove subfloor is generally adequate for carpet or vinyl, but tile installations demand greater structural stiffness to prevent grout cracking and water intrusion. For ceramic tile, the overall floor assembly must meet a minimum deflection threshold of L/360 under total design load, while natural stone requires a stiffer standard of L/720. To achieve this rigidity over standard 16-inch on-center joist spacing, industry standards mandate an exposure 1 rated subfloor panel (such as 3/4-inch T&G OSB or exterior-grade plywood) supplemented by an uncoupling membrane or a 1/2-inch cementitious backer unit set in a thin-set mortar bed and mechanically fastened. Additionally, any subfloor panel edges that do not land on a floor joist or feature factory tongue-and-groove joints must be supported by full-depth 2x solid blocking installed between the joists. Proper edge support prevents differential panel vertical deflection, which otherwise breaks thin-set bonds, opens seams, and allows water from bath spills to seep directly onto the joists below.
Q: Do I need a dedicated exhaust fan if the bathroom already has an operable window?
A: While Section R303.3 of the IRC technically allows an operable window with at least 1.5 square feet of ventilation area to satisfy minimum ventilation requirements, installing a mechanical exhaust fan is strongly recommended as a structural best practice. Windows are rarely opened during extreme winter or summer temperatures, allowing damaging moisture to accumulate inside the room. A mechanical exhaust fan rated to duct moist air directly to the home's exterior never into an attic or soffit space prevents structural wood rot, ceiling drywall failure, and mold colonization by maintaining controlled airflow regardless of outdoor weather conditions.
Q: What waterproofing standards must be met behind a tiled shower wall?
A: According to IRC Section R702.4, tile and grout are considered decorative finishes, not waterproof barriers. Water naturally saturates cementitious grout and tile surfaces over time. To prevent structural framing from rotting, building codes require a continuous waterproof membrane or an approved water-resistant backing material (such as cement board, fiber-cement board, or glass-mat gypsum panels) behind tiled shower walls up to a height of at least 70 inches above the drain. Paper-faced gypsum board (standard drywall) is strictly prohibited in wet locations like shower compartments. Additionally, a shower pan liner or liquid-applied membrane must slope a minimum of 1/4 inch per foot toward the drain to ensure proper water drainage beneath the tile setting bed.