Roughing In Back-to-Back Bathrooms: A Step-by-Step Drainage and Venting Guide
Adding a second bathroom adjacent to an existing one is one of the most efficient home remodeling strategies available. By sharing a wet wall, you can utilize existing drain, waste, and vent (DWV) infrastructure, saving both time and material costs. However, properly tying new fixtures into an existing drainage system requires careful planning, accurate layout measurements, and strict adherence to plumbing codes.
This guide breaks down a proven method for converting a single-bathroom plumbing layout into a back-to-back double bathroom, covering waste lines for sinks, toilets, and bathtubs on a concrete slab or raised floor foundation.
Understanding the Existing DWV Layout
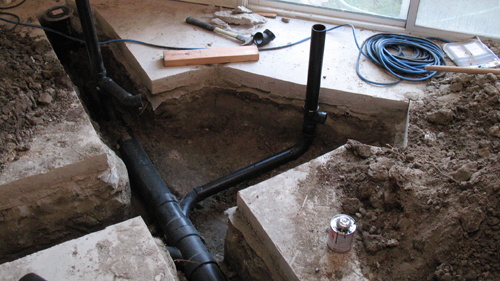
Before cutting into existing lines, expose the subfloor plumbing to identify the current layout. A typical single-bathroom installation includes:
A 3-inch main soil stack that picks up the toilet.
A reduction to a 2-inch or 1-1/2-inch line for the bathtub drain and trap.
An 1-1/2-inch or 2-inch branch line servicing the lavatory sink.
Continuous venting extending through the roof structure.
When retrofitting for a back-to-back layout, verify that the existing main lines sit deep enough beneath the slab or floor joists to accommodate the fall required for new fittings.
Step 1: Laying Out Centerlines and Clearances
Accurate rough-in dimensions are critical to avoid interference with finished walls, cabinets, and fixtures:
Establish reference lines on the subfloor using a straightedge, chalk line, or wall-anchored string lines.
Mark the 29-inch to 30-inch tub clearance boundary to prevent drain interference.
Locate the toilet flange centerlines. Standard toilet rough-ins require 12 inches from the finished wall. Remember to account for the thickness of wall framing plus drywall (typically 1/2 inch) when measuring off stud walls.
Set the lavatory sink drain centerline based on the planned cabinet dimensions.
Step 2: Modifying the Drainage Branch Lines
Bathtub Tie-In: Cut into the existing 1-1/2-inch or 2-inch tub branch line and install a sanitary tee or combination fitting oriented toward the new tub trap position. Maintain proper slope (minimum 1/4-inch fall per foot for lines under 3 inches).
Toilet Drain Integration: To service back-to-back toilets, install a 3-inch combination wye and 1/8 bend (combo fitting) along the main soil pipe, running vertically into a double sanitary tee or double fixture fitting. From this fitting, extend 90-degree sweeps up to the left and right toilet flanges.
Lavatory Sink Branch: For back-to-back sinks, tie a 2-inch branch line into the drainage system. Using a 2-inch line rather than the minimum 1-1/2-inch line reduces clogging risks and accommodates higher fixture unit loads.
Step 3: Re-Framing and Vent Line Integration
Proper venting prevents trap siphonage and allows sewer gases to exit safely.
Run a vertical 1-1/2-inch or 2-inch vent pipe up from the double lavatory sanitary tee within the shared wall cavity.
Invert the sanitary tee orientation for dry vent connections so air flows smoothly upward.
Use offset fittings (such as 22-1/2 degree or 45-degree elbows) where necessary to align the new vent with existing wall framing.
Tie the new vent branch back into the main stack at least 6 inches above the flood level rim of the highest sink fixture.
Once all ABS or PVC fittings are dry-fitted, verified for proper slope, and solvent welded, the system is ready for pressure testing and backfilling or floor repair.
THREE KEY TIPS
Account for Finished Wall Thickness During Rough-In: Always add 1/2 inch (or the thickness of your specific wall finish) to stud-face measurements when locating toilet flanges and tub drains. Measuring strictly from bare studs will leave your fixtures 1/2 inch too close to the finished wall.
Maintain Vent Connection Heights Above Flood Rims: When tying a dry vent back into a main stack or horizontal vent branch, the connection must be made at least 6 inches above the flood level rim of the highest fixture serviced by that vent to prevent waste from backing up into dry air pipes.
Use Long-Sweep Fittings for Horizontal-to-Vertical Transitions: Always use combination wyes, long-sweep 90s, or sanitary tees (in approved orientations) when transitioning waste direction. Standard short-radius 90-degree elbows are prone to blockages and are restricted by code on horizontal drainage runs.
BONUS QUESTIONS AND ANSWERS
Transition sentence: As you plan your back-to-back bathroom layout, taking time to review specific structural and code details will prevent costly teardowns during inspection.
Q1: Can back-to-back toilets be connected directly across from each other using a standard double sanitary tee?
A1: Under standard International Residential Code (IRC P3005.1.1) and Uniform Plumbing Code (UPC 704.2) guidelines, connecting back-to-back blow-out or gravity-flush toilets using a standard double sanitary tee is prohibited. Water discharged from one toilet can cross the barrel of the fitting and wash into the opposing fixture trap or siphon its seal. Code requires a double fixture fitting (directional cross pattern) or a double combination wye and 1/8 bend to direct flush flow downward into the vertical stack rather than horizontally across to the opposite side.
Transition sentence: Moving from toilet waste lines to sink installations, understanding pipe sizing requirements ensures your plumbing system handles simultaneous usage effortlessly.
Q2: Why is a 2-inch wet vent line recommended when connecting two lavatory sinks back-to-back instead of using 1-1/2-inch pipe throughout?
A2: While a single residential lavatory sink carries a 1 Drain Fixture Unit (DFU) load and requires only a 1-1/2-inch pipe, combining two back-to-back sinks doubles the discharge volume and trap arms. According to IRC Table P3105.1, using a 2-inch vertical pipe for the common waste and vent section provides extra volume to handle simultaneous discharge without pulling negative pressure on either sink trap, minimizing gurgling and slow drainage.
Transition sentence: Beyond individual fixture sizing, altering floor slab integrity during underground rough-in work demands careful structural consideration.
Q3: When trenching a concrete slab on grade to install new underground back-to-back plumbing lines, what structural rule must be followed regarding footings and foundation walls?
A3: When cutting trenches through a concrete slab near exterior bearing walls or interior footings, plumbing pipes must not undermine the load-bearing foundation soil angle of repose. According to IRC Section P2604.1, trenches dug parallel to footings must not extend into the 45-degree bearing plane projected downward from the bottom edge of the footing unless engineered protection is provided. Maintaining this clearance prevents structural settlement, wall cracking, or slab failure around the new plumbing channels.