CONNECTING A SINK DRAIN TO AN EXISTING VENT: A STEP-BY-STEP PLUMBING GUIDE
Adding a new fixture such as a kitchen sink, laundry basin, or outdoor wet bar requires integrating both a drain line and a proper venting pathway. In single-story residential construction, tying a new drain into an existing vertical vent line is a common practice known as wet venting. A wet vent serves a dual purpose: it carries liquid waste below the fixture drain connection while simultaneously providing airflow above it to protect trap seals from siphoning.
Understanding the structural constraints and plumbing code parameters before altering your drain-waste-vent (DWV) system ensures a safe, leak-free installation that complies with regional standards.
STRUCTURAL CONSIDERATIONS AND SINGLE-STORY LIMITATIONS
Wet venting is strictly restricted to single-story applications or the top floor of a multi-story structure. You cannot wet vent between different floor levels. Wastewater falling from an upper story creates pressure differentials and hydraulic surges that can disrupt or pull the water seal out of lower-level fixture traps, allowing sewer gas to enter the living space.
Additionally, before cutting into any drywall or concrete slab, map out the layout of your main branch lines. Where plumbing extends through or above a concrete floor, preserving structural pipe height is critical for future maintenance.
MODIFYING THE DWV STACK STEP-BY-STEP
To tie a new sink drain line into an existing vertical stack, follow a structured sequence to avoid misalignment and unnecessary demolition:
Create a Complete Layout Plan: Dry-fit all PVC or ABS fittings and pipe sections prior to applying solvent cement. Dry-fitting allows you to verify slope, alignment, and clearances without committing to permanent connections.
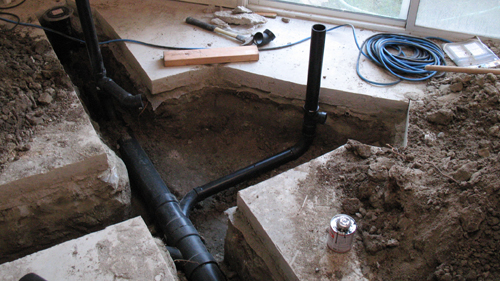
Protect the Stub-Out Pipe: When removing sections of the existing pipe stack, keep the bottom stub-out pipe as high above the finished floor or concrete slab as possible. Leaving ample exposed pipe prevents the need to jackhammer surrounding concrete if future modifications or repairs are required.
Position the Cleanout and Sanitary Tee: Remove the existing cleanout fitting and pipe section. Reinstall the cleanout assembly on the main line below the new branch fitting, ensuring full accessibility for drain-cleaning augers. Position a sanitary tee above the cleanout to receive the new branch line.
Connect to the Existing Vent Stack: If the vertical vent pipe has sufficient vertical play, slide it upward during fitting placement and lower it directly into the sanitary tee hub. If the pipe stack is rigid and immovable, cut out a small section and join the upper vent pipe to the new assembly using an approved, code-compliant shielded mechanical coupling.
OFFSETTING DRAIN LINES AND TRAP ARM DISTANCES
When the new sink location does not align directly with the main vent stack, you can angle or extend the horizontal trap arm. However, you must observe strict maximum length limitations to maintain proper venting action:
Pipe Sizing and Maximum Run: Under standard plumbing codes, a 1-1/2-inch horizontal trap arm connected to a sanitary tee has a maximum allowable distance to the vent of 3-1/2 feet (42 inches) at a pitch of 1/4-inch per foot. If your layout requires a longer reach, upgrading to a 2-inch drain pipe extends the maximum allowable trap arm distance up to 5 feet under Uniform Plumbing Code (UPC) standards, or up to 8 feet under International Plumbing Code (IPC) standards.
Directional Changes: If you must navigate around wall studs or cabinet interiors, use 45-degree or 22-1/2-degree elbows to offset the line while maintaining a continuous downward slope of 1/4-inch per foot toward the sanitary tee.
Water Supply Connections: Complete the installation by tapping into existing hot and cold water supply lines using tee fittings routed through the wall cavity or cabinet framing.
THREE KEY TIPS FOR CODE-COMPLIANT PLUMBING
Respect Trap Arm Distance Limits: Always limit the horizontal length of a 1-1/2-inch fixture drain to code-approved maximums (3-1/2 feet under UPC guidelines) before reaching the vent. Exceeding this distance creates a potential hydraulic siphon that can strip the P-trap seal.
Maintain Mandatory Drain Slope: Ensure all horizontal drainage piping slopes downward toward the main stack at a precise gradient of 1/4-inch per foot. Insufficient slope leads to solid waste accumulation, while excessive slope causes liquid to flow faster than solids, leading to recurring blockages.
Use Shielded Mechanical Couplings Above Grade: When retrofitting existing rigid vent stacks where pipes cannot be moved vertically, connect cut sections using metallic-shielded rubber couplings (no-hub couplings). Unshielded rubber boots lack structural rigidity and can allow the pipe stack to sag or shear over time.
BONUS QUESTIONS AND ANSWERS
Q1: Why are wet vents prohibited from spanning across multiple floor levels in a home?
As you plan your plumbing layout, you might wonder why vertical floor levels change the rules. International Residential Code (IRC) Section P3108 explicitly limits wet venting to fixtures on the same story level. When wastewater discharges from an upper story, it accelerates down the vertical stack, occupying a large percentage of the pipe diameter. This falling column of water creates positive pneumatic pressure in front of it and negative pressure behind it. In a multi-story wet vent, these severe pressure fluctuations would pull the air and water right out of lower-floor P-traps, drying out the traps and letting dangerous sewer gases vent into the home.
Q2: Which type of fitting is required where the horizontal trap arm enters the vertical vent stack, and why can you not use a standard tee or horizontal wye?
Selecting the correct fitting orientation is vital for preventing clogs and maintaining proper drainage airflow. International Plumbing Code (IPC) Section 706 mandates the use of a sanitary tee when transitioning from a horizontal fixture branch into a vertical drainage or vent stack. A sanitary tee features a sweep designed specifically to direct liquid waste downward into the vertical drain while leaving the upper portion of the fitting open to draw air from the vent above. Standard straight tees lack a directional sweep and allow waste to splash across the pipe, while horizontal directional fittings like combination wyes can restrict vertical airflow required for proper venting.
Q3: How far must a vertical plumbing vent extend through the roof structure to meet building codes?
Beyond the internal wall cavity, proper termination of the vent stack at the exterior roof line is essential for system functionality and weatherproofing. According to IRC Section P3103.1, open vent pipes extending through a roof surface must terminate vertically at least 6 inches above the roof line, or at least 6 inches above the anticipated snow accumulation line in colder climates. Additionally, vent terminals must be located at least 10 feet horizontally away from, or 3 feet above, any operable windows, doors, or mechanical air intakes to prevent foul sewer odors and toxic gases from recirculating into the living spaces of the home.