OFFSETTING BATHROOM SINK DRAIN PIPES WITHOUT OPENING THE WALL
Relocating a bathroom vanity often requires adjusting the under-sink waste and drain lines to line up with the new sink location. While tearing into the drywall to re-route drain stub-outs inside the wall frame is the ideal long-term structural solution, it is not always practical or necessary. When installing a enclosed vanity cabinet, minor to moderate drain shifts can be accomplished entirely outside the wall by reconfiguring the slip-joint P-trap and adding directional drainage fittings.
Before starting any under-sink plumbing modifications, ensure all components will remain hidden inside the cabinet base. Exposed plumbing offset modifications outside the wall are unappealing and susceptible to damage if left uncovered. Additionally, ensure you are working with an adjustable tubular P-trap assembly secured by slip nuts rather than fully solvent-welded Schedule 40 PVC joints, as adjustability is crucial for this method.
MINOR DRAIN SHIFTS: 1 TO 3 INCHES
For minor offsets where the new sink drain sits only a few inches to the left or right of the wall stub-out, full pipe modifications are usually unnecessary. The built-in adjustability of standard tubular P-trap assemblies allows you to bridge small gaps easily.
First, loosen the slip-joint nuts on the P-trap assembly. By slightly rotating the trap bend along the axis of the wall stub-out and extending the continuous waste wall arm outward from the wall fitting, you can swing the trap inlet into position directly beneath the new sink tailpiece.
When extending the trap arm out of the wall sanitary tee adapter, verify that a minimum insertion depth remains inside the fitting. Reusing a trap arm that only sits a quarter-inch inside the slip-joint fitting will fail to create an airtight and watertight seal, leading to leaks, sewer gas escape, or structural failure of the joint under water weight. If extending the arm leaves insufficient insertion depth, replace it with a longer continuous waste tube or a longer tubular trap arm.
MODERATE DRAIN SHIFTS: 4 TO 6 INCHES
When moving a sink beyond the reach of standard P-trap rotation, the angle of the main drain pipe leaving the wall must be altered.
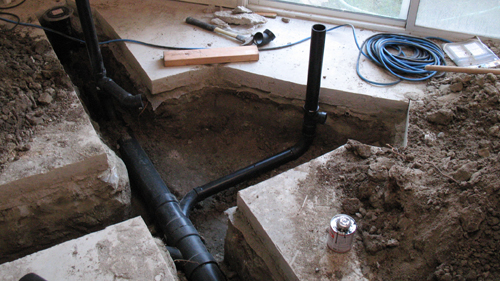
For an offset of roughly four to six inches, remove the existing slip-joint trap adapter attached to the wall stub-out. Depending on the existing material such as threaded galvanized steel, cast iron, or solvent-welded ABS/PVC this may require unscrewing threaded fittings or cutting back plastic pipe.
Once the pipe stub is prepared, solvent-weld a 22.5-degree elbow fitting onto the pipe end, followed by a short length of pipe and the slip-joint trap adapter. This slight directional change directs the outlet point toward the offset sink location. The P-trap and trap arm can then be reattached, rotated, and adjusted to align precisely with the new sink drain tailpiece.
LARGER DRAIN OFFSETS: 6 INCHES AND BEYOND
For larger lateral adjustments, a 22.5-degree fitting may not provide enough angle. Switching to a 45-degree elbow fitting allows the drain line to extend further across the interior space of the vanity cabinet before converting back to the slip-joint trap adapter.
In extreme cases requiring significant lateral movement, you can combine directional fittings such as pairing a 22.5-degree elbow with a 45-degree elbow to wind the drain line around cabinet obstructions directly to the P-trap assembly.
THE IMPORTANCE OF DRY-FITTING
Before applying any PVC/ABS primer and solvent cement, always dry-fit the entire assembly. Set the new vanity cabinet in place, insert the un-glued fittings and pipe segments onto the wall stub-out, attach the P-trap to the sink tailpiece, and swing the components into position.
Dry-fitting allows you to measure exact pipe lengths, double-check proper pitch, and verify that the plumbing clear of drawer slides, shelf dividers, and cabinet backs before permanently bonding any joints.
THREE KEY CONSTRUCTION TIPS:
Maintain Proper Insertion Depth: Always ensure tubular trap arms extend at least 1 to 1.5 inches into slip-joint fittings. Extending an arm too far out to bridge a gap leaves insufficient overlap, leading to joint failures and leaks under water pressure.
Dry-Fit Assembly Before Solvent Welding: Assemble all PVC or ABS offset fittings, pipe extensions, and trap adapters completely without glue first. Test the alignment with the actual vanity and sink installed to verify clearances before permanently bonding the pipe.
Always Keep Modifications Hidden and Supported: Outside-the-wall drain modifications using directional elbows should only be performed inside closed vanity cabinets. Unsupported horizontal pipe runs sitting outside of walls are prone to sagging and physical impact if left exposed.
BONUS QUESTIONS AND ANSWERS:
TRANSITION: While adjusting P-traps inside cabinets resolves minor alignment issues, understanding wider plumbing rules ensures your installation remains safe, functional, and fully up to code.
QUESTION 1:
Do I need to install extra wall blocking before mounting a heavy bathroom vanity and stone countertop?
TRANSITION:
Before you set your new vanity in place and secure it to the wall, it is essential to look at what is supporting the weight behind the drywall.
ANSWER:
Yes, installing solid wood blocking between the wall studs is strongly recommended, especially for floating vanities or cabinets carrying heavy granite or quartz tops.
Structural and Code Reasoning: The International Residential Code (IRC Section R301) requires building elements to safely support designed dead and live loads. A double-sink vanity with a solid stone top can easily exceed 200 to 300 pounds. Screwing solely into drywall anchors or relying on a single stud can cause the cabinet to sag or pull away from the wall over time. Installing horizontal 2x6 wood blocking between studs prior to drywall patch-up ensures that your cabinet mounting screws bite into solid dimensional lumber, properly distributing the structural load.
Q2: Why must horizontal drain pipe offsets maintain a slope of exactly 1/4 inch per foot, and what happens if the slope is too steep?
A2: IRC Section P3005.7 mandates that horizontal drainage piping 2.5 inches or smaller in diameter must be installed with a uniform minimum downward slope of 1/4 inch per foot (approximate 2 percent grade) toward the main drain stack.
Structural Reasoning: Plumbing drainage systems rely on gravity flow dynamics balancing solids and liquids. If a horizontal drain line has insufficient slope, water moves too slowly, causing suspended organic solids and debris to settle, collect, and form clogs. Conversely, if the slope is too steep (exceeding 1/2 inch per foot on short runs), liquids flow too quickly ahead of solid material, leaving debris behind on the pipe walls to dry out and eventually obstruct the line.
TRANSITION: Beyond horizontal lengths and slopes, proper sizing of the under-sink components prevents drainage bottlenecks at the fixture outlet.
Q3: Why do bathroom sinks transition from a 1.25-inch tailpiece to a 1.5-inch P-trap and wall stub, and is it code-compliant to reverse this sizing?
A3: IRC Table P3002.1 and UPC standards designate that the minimum allowable trap size for a lavatory sink is 1.25 inches. However, modern residential plumbing framing typically uses 1.5-inch Schedule 40 pipe for internal branch drains and wall stub-outs. Increasing pipe size in the direction of flow (from a 1.25-inch lavatory tailpiece up to a 1.5-inch trap and waste line) using a reducing washer is fully code-compliant. Reversing this size reducing a 1.5-inch drain line down to a 1.25-inch pipe in the direction of flow is strictly prohibited by building codes.
Structural Reasoning: Fluid dynamics dictate that restricting flow downstream creates a choke point where solids and wastewater accumulate under pressure, significantly increasing friction loss and risk of recurring line blockages. Plumbing systems must always maintain equal or increasing cross-sectional area as wastewater moves toward the main building drain.