HOW TO RELOCATE A TOILET DRAIN PIPE ON A CONCRETE SLAB
Relocating a toilet during a bathroom remodel often requires moving the drain pipe anywhere from a few inches to several feet away from its original location. When working on a concrete slab foundation, this process involves cutting through concrete, excavating soil, and adjusting underground DWV (Drain, Waste, and Vent) piping. To ensure a successful installation that functions correctly and passes municipal plumbing inspections, you must properly evaluate slope, distance limits, and fitting selection before making any cuts.
STEP 1: EVALUATING DRAIN DEPTH AND REQUIRED SLOPE
Before cutting concrete or trenching, you must verify that the existing drainage line is deep enough to allow for proper slope over the extended distance. Standard gravity-fed drainage pipes require a minimum slope to maintain sufficient liquid velocity to carry solids. According to model plumbing codes, 3-inch drain pipes typically require a minimum slope of 1/4 inch per foot (2 percent slope), though some local jurisdictions permit an 1/8 inch per foot slope for 4-inch or larger pipes under specific conditions.
To check your available depth, measure down from the top of the existing pipe opening to the flow line of the main branch. If you have approximately 10 inches of vertical drop from the finished floor level to the existing branch connection, you generally have enough fall to extend the drain several feet. For example, if you need to move the toilet 8 feet using a required slope of 1/4 inch per foot, the new toilet flange location must sit 2 inches higher than the downstream connection point. If your initial depth assessment shows insufficient fall, the system will not drain properly, and you should re-evaluate your layout before proceeding.
STEP 2: EXCAVATING AND PREPARING THE SLAB
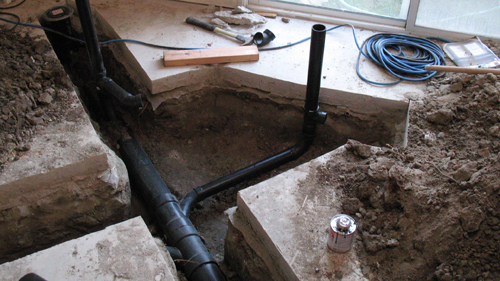
Once you have confirmed that the proper slope can be achieved, break out the section of concrete slab along the intended path using a jackhammer or concrete saw. Excavate the soil underneath to expose the existing PVC or ABS drain line.
Do not cut the existing pipe immediately. Confirm your final measurements and dry-fit your proposed layout within the exposed trench first. If your plan encounters unexpected underground obstacles or structural limitations, keeping the existing pipe intact allows you to backfill the trench and repair the concrete without incurring costly plumbing repairs. Once the plan is verified, make a clean, square cut on the existing line.
STEP 3: SELECTING FITTINGS AND EXECUTING THE RELOCATION
When routing the relocated drain line back to the main stack or existing fitting, choose fitting combinations that minimize flow resistance.
Direct Inline Extensions: For short relocations of just a few feet, attaching a coupling to the existing line and installing a 90-degree long-sweep elbow up to the new closet flange location is straightforward and widely accepted by local building codes.
Angled Offsets: For longer runs or offset layouts, using 45-degree or 22.5-degree elbows is preferred over sharp 90-degree turns. Gradual bends reduce friction, prevent clogs, and make future drain snaking significantly easier.
Strategic Coupling Placement: When joining new pipe to the existing layout, avoid glueing fittings immediately next to one another. Leave a section of straight pipe (at least a few inches) between couplings. This provides a tolerance buffer, allowing you to cut and adjust the assembly if your final rough-in measurement is off by an inch, without needing to cut out primary fittings.
By carefully calculating pipe fall, dry-fitting components, and selecting gradual fittings, you can successfully relocate a slab-on-grade toilet drain that operates reliably for years.
THREE KEY CONSTRUCTION TIPS:
Verify Drainage Slope Before Cutting Concrete: Always calculate your available vertical fall before breaking ground. A standard 3-inch toilet drain requires a minimum downward slope of 1/4 inch per linear foot. Ensure your trench depth allows this pitch from the new toilet flange to the main drain line.
Use Long-Sweep and Gradual Elbows: Avoid using sharp, short-turn 90-degree elbows on horizontal drainage runs. Use long-sweep 90s, or combine 45-degree fittings to change directions smoothly, reducing the risk of solid waste blockages and ensuring compliance with code standards.
Leave Piping Clearance Between Glue Joints: When installing repair couplings and fittings, leave several inches of straight pipe exposed between glue joints. This extra length allows you to cut and re-adjust the assembly if a rough-in measurement needs a minor correction.
BONUS QUESTIONS AND ANSWERS:
When extending a toilet drain pipe, homeowners often ask how far the fixture can be placed from its main vent stack before needing a new vent line. Under standard model plumbing codes like the International Residential Code (IRC) and Uniform Plumbing Code (UPC), the maximum allowable unvented trap arm length for a 3-inch pipe is 6 feet (IRC) or 6 feet to 12 feet depending on the specific code edition and pipe diameter. If you move a toilet drain pipe beyond this maximum distance from the vent fitting, the flowing water can create a siphon that vacuums the water out of the toilet trap, allowing sewer gases to enter the home. If your relocation exceeds your local code's maximum trap arm length, you must install an additional vent line or an approved Air Admittance Valve (AAV) where permitted.
As you plan the trenching path through the concrete slab, it is essential to consider the structural integrity of the foundation. Cutting a continuous channel through a slab-on-grade foundation can disrupt the concrete's tensile strength and potentially cut through embedded steel reinforcement rebar or wire mesh. Under IRC Section R506, concrete slab-on-grade floors must maintain a minimum thickness (typically 3.5 inches) and structural continuity. When trenching for plumbing, avoid cutting into post-tension cables or load-bearing thickened slab footings, and ensure the exposed soil is thoroughly compacted before pouring repair concrete to prevent future slab settling and pipe shear.
After the new drain line is glued together and before the trench is backfilled, a proper pressure test should always be performed. Standard plumbing codes require DWV systems to undergo a water test or air test prior to backfilling and slab replacement to ensure all solvent-welded joints are completely watertight. Under standard inspection procedures, the pipe section is plugged and filled with a 10-foot head of water (or pressurized with air at 5 psi) for at least 15 minutes to verify zero leakage. Performing this test prevents concealed leaks beneath the newly poured concrete slab, which could otherwise cause subgrade soil erosion, foundation movement, or costly moisture damage.