Constructing a curved or rounded wall is a highly rewarding challenge that tests your precision and framing skills. While standard linear framing is straightforward, a curved wall introduces unique variables in plate shaping, stud spacing, and structural stabilization. Whether you are adding an architectural feature to a custom home or building a standalone partition, mastering this technique requires careful planning and a solid understanding of structural mechanics. This guide will walk you through the essential steps of framing and finishing a curved wall, from cutting the radius plates to applying the final coat of plaster.
SHAPING AND CUTTING THE FRAMING PLATES
The foundation of any curved wall is its top and bottom framing plates. For a standard 10-foot radius wall using standard 2x4 framing, the plates will dictate the final shape and footprint. While some builders might attempt to trace and cut a radius out of wide dimensional lumber like a 2x8 or 2x12, relying on solid wood for a tight radius can sometimes be structurally problematic due to cross-grain weakness.
The universally accepted best practice in the construction industry is to use 3/4-inch plywood or oriented strand board (OSB). You can cut the exact curvature into the sheet goods and laminate multiple layers together to achieve the necessary plate thickness. If you find cutting a single thick plate difficult, stepping down to thinner, easily workable materials and layering them is an excellent strategy.
STUD SPACING AND WALL ASSEMBLY
Once your plates are securely cut and aligned, assembling the wall requires tighter tolerances than standard framing. A conventional straight wall utilizes studs spaced at 16 or 24 inches on center. However, to maintain a smooth, fluid curve that sheathing can easily attach to, a curved wall requires much closer spacing.
Placing your studs 8 inches on center is highly recommended for a standard residential curve. Depending on how tight the radius is, you may even need to space them closer. This tighter spacing reduces the flat spots between studs and provides a rigid backing for your finishing materials, ensuring the wall maintains its true architectural shape.
STABILIZING THE WALL WITH CONCRETE ANCHORS
Freestanding walls or walls that do not tie into a ceiling joist system require robust lateral support to prevent them from racking or failing under pressure. Standard anchor bolts are often not enough for a freestanding curved partition.
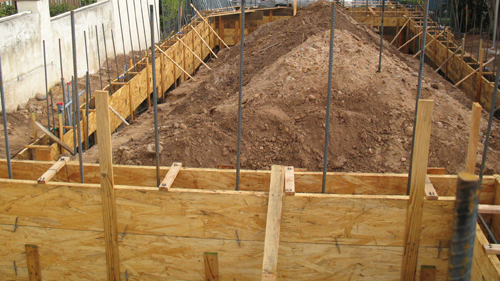
An efficient method for stabilizing this type of structure involves using structural steel, such as a round steel pole, square tubing, or heavy-duty angle iron. If you are pouring a new concrete slab, you can create a form block-out to leave a void in the concrete where the wall will go. Once the concrete cures, you can perfectly align your wall, set your structural steel into the void, attach it directly to the wood framing, and then fill the hole with high-strength concrete. This provides absolute precision, avoiding the headache of anchor posts shifting during the main slab pour. Alternatively, heavy steel brackets can be bolted to the cured slab and welded to internal steel supports.
FINISHING THE WALL: PLASTER OVER DRYWALL
Finishing a tightly curved wall introduces its own set of hurdles. Standard drywall is rigid and difficult to force around a tight radius without snapping. While flexible drywall products exist, an elegant and historically reliable method is to use plaster.
By applying a suitable lath over your tightly spaced studs, you can trowel plaster directly onto the wall, following the radius perfectly. If your design includes baseboards or crown molding, you can install the trim first, or leave precise reveals, allowing the plaster to die cleanly into the trim lines. Plastering is a labor-intensive art, but it yields a seamless, durable finish that is ideal for complex architectural shapes.
THREE KEY CONSTRUCTION TIPS
LAMINATE PLYWOOD FOR PLATES: While cutting a curve out of solid 2x12 lumber is possible, the grain direction creates weak points that are prone to splitting. Always use overlapping layers of 3/4-inch plywood or OSB glued and nailed together to create structurally sound, split-resistant top and bottom plates.
DECREASE STUD SPACING FOR TIGHT RADII: Standard 16-inch on-center spacing will result in a faceted, blocky wall rather than a smooth curve. Spacing studs 8 inches on center (or even 6 inches for very tight curves) prevents structural flat spots and provides adequate backing for lath or flexible drywall.
USE BLOCK-OUTS FOR STRUCTURAL POSTS: When embedding steel support posts in a concrete slab for a freestanding curved wall, avoid wet-setting them during the main pour. Building a wood or foam block-out allows you to align the framing perfectly after the slab cures, insert the post, and pour a secondary anchor footing for zero-tolerance accuracy.
BEYOND THE BASICS: STRUCTURAL AND CODE CONSIDERATIONS
Once you have mastered the physical framing of a curved wall, it is important to understand how these custom shapes interact with modern building codes. Here are a few advanced considerations to keep in mind when planning your next curved framing project.
Q: Are curved walls permitted to be load-bearing under standard residential building codes?
A: Generally, no, not without an engineer's stamp. Under the International Residential Code (IRC Section R602), prescriptive wood framing codes are based on straight, linear wall assemblies. Because a curved top plate cannot distribute vertical loads in the same continuous, predictable manner as a straight plate, a heavily loaded curved wall usually requires a licensed structural engineer to design the headers and load paths. Most curved walls in residential settings are designed as non-load-bearing architectural partitions.
Q: How do fire blocking requirements apply to a curved wall cavity?
A: The International Residential Code (IRC Section R302.11) requires fire blocking in concealed spaces of stud walls and partitions, both vertically at the ceiling and floor levels, and horizontally at intervals not exceeding 10 feet. For a curved wall, this means any horizontal fire blocks installed between the studs must be custom-cut to match the exact radius of the wall to ensure a tight seal against the sheathing, preventing the passage of flame and hot gases.
Q: If I want to avoid the labor of wet plaster, can standard drywall be bent to fit a curved frame?
A: Standard 1/2-inch drywall is extremely rigid. According to the Gypsum Association guidelines, standard 1/2-inch drywall can only be bent dry to a 20-foot radius, which is much larger than most interior architectural curves. For tighter curves down to a 5-foot radius, you must use specialized 1/4-inch flexible gypsum board. This material is designed explicitly for curved applications and is typically installed in two overlapping layers to achieve a standard 1/2-inch wall thickness.