UNDERSTANDING GABLE ROOF TIE-INS FOR COMPLEX HOME ADDITIONS
Adding a structural addition to an existing residential home introduces complex architectural and framing challenges, particularly when integrating new rooflines into the original structure. When expanding a building footprint with stepped exterior walls or a jogged perimeter, the roof framing must adapt to preserve structural integrity, maintain proper drainage, and create a visually seamless exterior.
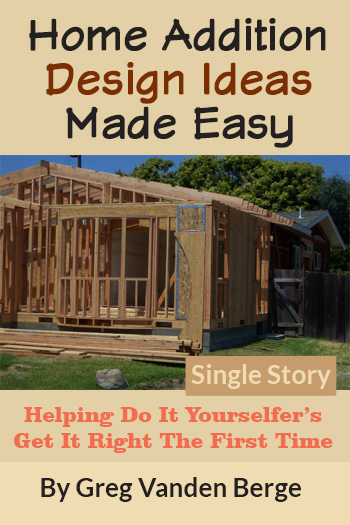
A common design challenge occurs when adding a multi-part addition to the rear of a traditional gable-roof home. For instance, when an addition extends backward and steps outward sideways, it creates multiple intersecting roof planes. Understanding how these primary and secondary ridge lines interact is crucial before cutting a single rafter or ordering pre-engineered roof trusses.
VISUALIZING THE ROOF GEOMETRY AND RIDGE LINES
When framing an addition with a staggered or L-shaped floor plan, the roof system generally splits into primary and secondary structures:
The Main Addition Ridge: The primary section of the addition spans the larger rectangular footprint. This main addition features its own dedicated ridge line running perpendicular or parallel to the main house, depending on the framing layout.
The Secondary Pop-Out Gable: The stepped portion of the addition requires a secondary, smaller gable roof. Its ridge line sits at a lower elevation or intersects the main addition's roof slope, creating a valley where the two slopes converge.
The Existing Roof Intersect: Where the new roof meets the original structure, a valley board or over-framing system (often called a sleeper or layover framing) is installed directly over the existing roof sheathing, transferring loads to structural bearing points.
STRUCTURAL LOAD PATHS AND VALLEY TIE-INS
Integrating intersecting gable roofs requires strict adherence to framing principles to ensure loads transfer continuously down to the foundation:
Ridge and Valley Rafter Sizing: Unlike standard common rafters, valley rafters support loads from multiple jack rafters. Therefore, valley rafters must be deeper than common rafters to provide full bearing for the angled cuts and must be sized according to spans mandated by building codes.
Bearing Walls and Header Support: Stepped walls create exterior corners that require point-load support. Posts and headers within the wall framing must be aligned beneath structural hips, valleys, and ridge supports to prevent ceiling sagging.
Over-Framing Techniques: In non-bearing roof intersections, builders often frame the main addition roof first, sheath it, and then lay a valley board on top of the sheathing to support the jack rafters of the smaller pop-out gable.
CONCLUSION
Framing an addition with intersecting gables requires careful planning to align ridge heights, establish correct roof pitches, and direct water away from interior valleys. By mapping out your ridge lines and structural load paths early in the design phase, you ensure the new addition looks like a natural extension of the original home while meeting strict building safety standards.
THREE KEY CONSTRUCTION TIPS
SIZES AND BEARING FOR VALLEY RAFTERS
When framing intersecting gable roofs, valley rafters carry significantly higher tributary loads than standard common rafters. Always size valley rafters at least one dimension deeper than common rafters (for example, using 2x10 valley rafters with 2x8 common rafters) to accommodate the full-depth angled cuts of jack rafters and prevent deflection under live snow loads.
INSTALL CONTINUOUS VALLEY FLASHING AND UNDERLAYMENT
Roof valleys where two gable slopes meet are high-volume water collectors. Prior to shingling, install a self-adhering polymer-modified bitumen membrane (ice and water shield) extending at least 18 inches on each side of the valley centerline, followed by a corrosion-resistant W-valley metal flashing per standard weatherproofing guidelines.
MAINTAIN CONTINUOUS LATERAL BRACING AND TIE-DOWNS
Where a new gable roof attaches to an existing roof structure, do not rely solely on nails driven into existing sheathing. Secure new framing directly to existing structural rafters or top plates using engineered hurricane ties or structural screws to establish a continuous load path that resists wind uplift forces.
BONUS QUESTIONS AND ANSWERS
QUESTION 1:
Transition: Beyond mapping out ridge lines, builders must also consider how new roof framing connects to the existing building framing.
How does the International Residential Code (IRC) regulate framing ties where a new roof intersects an existing roof?
Answer: Under International Residential Code (IRC Section R802), all roof framing members must be securely fastened to supporting structural elements to form a continuous load path down to the foundation. When installing a layover or over-framed valley system on an existing roof, the valley board cannot simply rest on ply sheathing alone unless the underlying rafters are structurally evaluated to carry the added point loads. Building codes require that fasteners penetrate through the existing roof sheathing directly into the underlying structural rafters by a minimum required depth, ensuring wind uplift and gravity loads are transferred into the existing structural frame rather than relying on plywood shear capacity.
QUESTION 2:
Transition: Water management is another critical factor when adding stepped gable sections to a home addition.
What building code requirements govern step flashing and kickout flashing where a lower gable roof wall meets an elevated roof plane?
Answer: Per IRC Section R905.2.8.3, step flashing is required at all vertical wall-to-roof intersections. The flashing must consist of individual pieces installed with each course of shingles, extending at least 4 inches up the vertical wall and 4 inches onto the roof deck. Additionally, where the lower edge of a roof valley or stepped wall terminates at an exterior wall, a kickout flashing (wall-diverter flashing) must be installed at the end of the step flashing run. Structural engineering and building science standards mandate kickout flashings to divert concentrated runoff away from the wall siding and into the gutter, preventing severe wall cavity rot and structural framing decay.
QUESTION 3:
Transition: In addition to gravity loads, homeowners often wonder how new gable end walls handle extreme weather forces.
Why do building codes require specific wall bracing and attic gable end framing for new home additions?
Answer: Under IRC Section R602.10 and high-wind structural guidelines, gable end walls are vulnerable to lateral wind forces because they present a large vertical surface area. When framing a new gable addition, building codes mandate continuous wall bracing (such as wood structural panel shear walls) and dedicated gable end rakes or truss bracing. In particular, the joint where the top plate of the wall meets the bottom chord of the gable framing must be braced against hinge failure. Without proper mechanical ties, structural blocking, and shear paneling, wind pressure pushing against the new gable end can cause the wall joint to pivot, risking ceiling collapse or structural wall separation.
QUESTION 4: TALL GABLE WALL BRACING
Creating that dramatic open space also drastically changes how your exterior walls handle environmental pressures like high winds.
Q: What special framing techniques are structurally required for the gable end walls in a vaulted room?
A: Removing the flat ceiling joists takes away the lateral cross-bracing that normally secures the top of a standard wall, creating a structurally weak hinge point where the rectangular wall meets the triangular gable.
To resist high wind loads and prevent the wall from bowing in or collapsing, the structural code requires these tall gable walls to be balloon framed.
This engineering requirement means continuous, full-height lumber must run unbroken from the bottom floor plate all the way up to the angled roof line, rather than platform framing a separate triangular wall on top of a standard eight-foot rectangular wall.