Building a raised foundation on a sloped piece of land often requires stepping the footings down the hillside. When a lot has a minor slope, such as five degrees, it is sometimes possible to use a standard level footing. However, as the grade increases to ten degrees or more, stepping the foundation down becomes essential to minimize unnecessary concrete use and transition the foundation efficiently into wood-framed walls. Creating a level, structurally sound layout is the most critical phase of this process.
Establishing The Layout And Guide Boards
The layout process begins by establishing a straight, perfectly level upper form board to dictate the front alignment of the building. Once this primary board is firmly staked and secured, level guide boards are installed. These guide boards set the reference plane for the entire perimeter. When working on a standard residential layout, framing squares provide an excellent starting point for aligning the guide boards perpendicular to the front form.
To ensure the guide boards do not interfere with the actual concrete forms, they are typically set back two to three feet from the perimeter edge. If the building dimensions allow, using a single, continuous piece of lumber for the guide board is highly recommended over splicing smaller boards together. A continuous board eliminates the risk of misalignment at the joints. If splicing is unavoidable, a rigid block must be nailed across the joint to maintain a perfectly straight line.
Squaring And Measuring The Foundation
Accurate measurements are the backbone of a square foundation. Once the guide boards are leveled and secured, overall dimensions must be marked. A common technique involves establishing vertical markers by dropping a plumb line from the level guide boards down to the form boards.
To verify the entire assembly is square, cross-measurements must be taken diagonally from the inside points of the form boards. If the two diagonal measurements match exactly, the layout is perfectly square. It is crucial to physically mark which side of the line the form board will sit on to prevent costly dimensional errors. Accidentally placing a board on the wrong side of a layout line can throw off subsequent measurements by several inches, requiring complete disassembly and rebuilding of the forms.
Calculating And Forming The Step-Downs
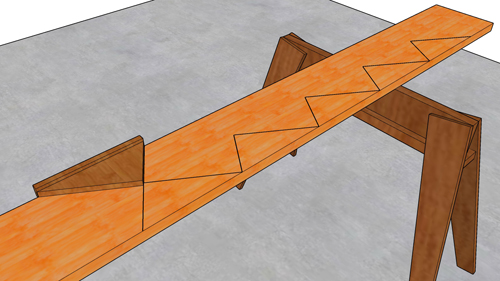
Once the layout is square and level, the step-down dimensions are calculated by measuring the total vertical drop from the highest point of the foundation to the lowest point. This total drop is then divided by the desired number of steps.
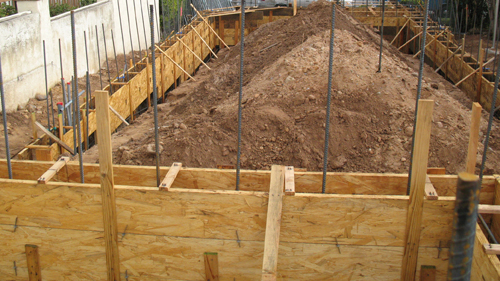
To streamline the framing process, form carpenters often adjust the vertical drop to match standard lumber dimensions. For example, instead of ripping boards to custom fractional heights, builders frequently use standard two-by-tens or two-by-twelves for the primary steps and make minor vertical adjustments on the final step. The length and height of individual step-downs can vary based on structural plans, sheer panel requirements, or specific architectural details, provided the cumulative drop equals the total elevation change.
Three Key Construction Tips
Use Continuous Lumber For Guide Boards: Whenever possible, utilize a single piece of straight lumber that spans the entire length of the foundation side. This minimizes the risk of deviation and maintains a true, uncompromised reference line.
Clearly Mark The Form Board Placement Side: When pulling foundation measurements, use a pencil to explicitly mark a directional 'X' denoting exactly which side of the reference line the form board should occupy. A simple inside-versus-outside placement mistake will disrupt the entire building footprint.
Optimize Step Heights Using Standard Lumber: To save time and labor, base your vertical step heights on standard dimensional lumber sizes, such as nine and a half inches for a two-by-ten or eleven and a half inches for a two-by-twelve. Any necessary fractional adjustments can be absorbed in the final, lowest step.
Frequently Asked Questions About Hillside Soil Preparation
Now that we have covered the primary steps of hillside foundation excavation, let us explore some of the more advanced soil mechanics and code requirements you will encounter during site preparation.
Why Is Fill Dirt Compacted In Thin Layers Instead Of All At Once
When preparing a hillside pad, importing and compacting soil is often necessary to create a level building surface. Structural engineers and the International Building Code require fill dirt to be placed in shallow layers, known as lifts, which are typically restricted to a maximum of six to eight inches in depth before compaction.
If soil is dumped in a massive pile and rolled over, the compaction equipment only densifies the top foot of material, leaving the deeper soil loose and highly susceptible to future settlement. By compacting in thin lifts, the energy from the vibratory roller reaches the bottom of the layer, ensuring the entire depth achieves the minimum 90 percent maximum dry density required by most geotechnical reports and building codes.
What Is Over excavation And Why Do Geotechnical Engineers Require It
It might seem counterintuitive to dig deeper into a hillside only to put dirt back, but over excavation is a critical structural mitigation strategy for expansive clay soils. Expansive soils swell when wet and shrink when dry, generating enough force to crack concrete footings and heave foundation walls. To prevent this, the International Residential Code and local geotechnical guidelines often dictate removing the expansive topsoil down to a specific depth, usually three to five feet below the bottom of the footing. This native material is either replaced with non-expansive, engineered fill or moisture-conditioned and heavily compacted back into the hole. This creates a uniform, stable buffer zone that isolates the foundation from seasonal moisture changes deep in the hillside.
How Do Heel Drains Protect Hillside Foundations From Hydrostatic Pressure
Water is the greatest threat to a hillside foundation, making subsurface drainage an absolute necessity. When water flows down a slope and saturates the soil against the uphill side of a foundation wall, it creates tremendous lateral weight known as hydrostatic pressure. The International Residential Code Section R405.1 mandates foundation drainage systems for walls that retain earth. A proper hillside drainage system intercepts this subterranean water using specific components:
A perforated pipe placed near the base of the uphill footing
Washed gravel surrounding the pipe to allow rapid water entry
Geotextile filter fabric wrapping the gravel to prevent silt and soil intrusion
This system safely channels subsurface runoff away from the building envelope, preventing structural bowing, water intrusion, and localized soil liquefaction near the footings.
What Is Surcharge Loading And When Is It Used On Steep Slopes
Sometimes the native soil on a hillside is too soft or compressible to immediately support the weight of a new structure, even after surface compaction. In these cases, engineers employ a technique called surcharge loading or pre-loading. Earthmoving crews pile a massive, temporary mound of heavy dirt over the future building footprint and leave it there for weeks or months.
This immense static weight forces the underlying deep soil layers to consolidate and settle before any concrete is poured. Once geologists verify through settlement monuments that the ground has stopped moving, the surcharge dirt is removed. This leaves behind a highly densified subgrade that easily meets the bearing capacity requirements of the building code without the risk of post-construction differential settlement.