Building A Concrete Foundation For A Home Addition
When structuring high-level content and resources for home remodeling methodologies and structural framing, establishing a rock-solid foundation is the literal and figurative starting point. Properly executing a residential concrete foundation requires strict adherence to structural engineering principles and building codes. This guide outlines the rigorous, step-by-step methodology for laying out, forming, and reinforcing a concrete slab foundation for a residential room addition, ensuring total structural integrity from the ground up.
Laying Out And Squaring The Foundation
The first step in any foundation project is establishing a precise, square outline that perfectly aligns with the existing structure. Using straight guide boards or taut mason lines, project your dimensions outward from the existing foundation. Because older foundations often feature uneven stucco or slightly bowed concrete, never rely on a single measurement. Instead, verify the layout by cross-squaring the perimeter. Measure diagonally from corner to corner; if the two diagonal measurements are identical, the layout is perfectly square. This principle, alongside the standard three-four-five rule of right angles, ensures the new addition will transition seamlessly into the existing framing.
Excavation And Footing Preparation
With the layout established, excavation for the foundation footings can begin. While a standard footing for a light-frame room addition might measure twelve inches wide by twelve inches deep, actual dimensions must always be dictated by the structural loads and local soil bearing capacity. Furthermore, it is critical to address local climate variations. In regions subject to freezing temperatures, building codes mandate that foundation footings extend below the local frost line to prevent frost heave, which can easily shatter a shallow slab. Always excavate slightly wider than the final formwork dimensions to allow room for driving stakes without collapsing the trench walls. Additionally, excavating a small keyway beneath the existing foundation edge provides a pressure point that limits differential settlement between the old and new structures.
Building And Bracing The Formwork
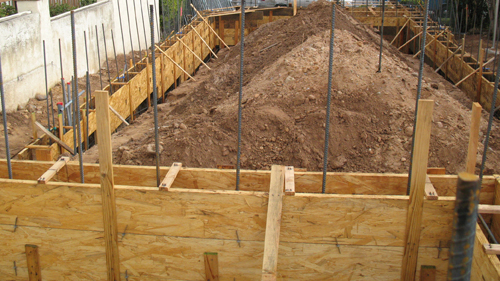
Concrete exerts immense lateral pressure before it cures. Therefore, robust formwork is non-negotiable. Construct the outer forms using straight, high-quality dimensional lumber, allowing the boards to extend past the corner intersections to prevent blowouts. Secure the forms using heavy-duty stakes spaced no more than three feet on center. Drive the stakes firmly into the subgrade and utilize angled kicker braces to keep the form walls perfectly plumb and aligned with your string lines. When securing the lumber to the stakes, duplex nails are highly recommended. Their double-headed design allows for rapid, clean extraction during the form-stripping process without damaging the green concrete.
Installing The Vapor Retarder And Base
Moisture mitigation is a critical component of building science, particularly for habitable room additions. Once the native soil is properly compacted, install an approved fill material or gravel base to encourage drainage. Over this base, building codes typically require a continuous vapor retarder to prevent ground moisture from wicking up through the porous concrete. Roll out the vapor retarder, ensuring all seams are overlapped by a minimum of six inches and taped securely. While some regional practices involve placing a one-inch layer of sand directly over the vapor barrier to aid in curing, many modern structural guidelines recommend pouring the concrete directly onto the barrier to prevent the sand layer from becoming a trapped reservoir for water.
Structural Reinforcement And Doweling
To unite the new addition with the existing house, structural doweling is required. Drill holes into the face of the existing foundation, clean them thoroughly of all silica dust, and inject a high-strength structural epoxy before inserting number four rebar dowels. The holes must be sized according to the epoxy manufacturer's specifications. Inside the new slab area, construct a grid of number four rebar, typically spaced sixteen inches on center. The rebar must be elevated on concrete spacer blocks to sit within the middle or upper third of the slab depth. Proper concrete cover is a strict code requirement; steel reinforcement must be kept a minimum of three inches away from soil and two inches away from the top surface to prevent moisture penetration and subsequent spalling caused by rust expansion. Where rebar lengths meet, they must overlap by a minimum of twenty inches to maintain continuous tensile strength.
Placing Foundation Anchor Bolts
Before the concrete pour begins, anchor bolts must be suspended in their exact final positions to secure the future sill plates and wall framing. Suspend the bolts using temporary wooden brackets nailed across the top of the forms, ensuring the center of each bolt aligns precisely with the center of your planned wall framing. Standard building codes generally require a minimum of one-half-inch diameter anchor bolts, embedded at least seven inches into the concrete. However, sizing up to a fourteen-inch or sixteen-inch bolt often provides a safer margin of error for embedment depth, especially when accommodating the thickness of both the concrete cover and the wooden sill plates.
Three Key Construction Tips
Use Six-Mil Polyethylene, Not Six Millimeter: When selecting a vapor retarder, construction terminology is highly specific. Building codes require a minimum six-mil thickness. A mil is one-thousandth of an inch, meaning the plastic is zero-point-zero-zero-six inches thick. Do not confuse this with six millimeters, which would be an unwieldy, quarter-inch thick sheet of plastic.
Maintain Proper Concrete Cover For Rebar: Rebar provides zero structural value if it rusts. The International Residential Code requires a minimum of three inches of concrete cover when concrete is cast directly against the earth, and two inches for concrete exposed to weather or ground conditions after pouring. Ensure your spacer blocks are sized correctly to meet these tolerances.
Verify Anchor Bolt Embedment Depth: Never eyeball structural connections. Codes require anchor bolts to be embedded a minimum of seven inches deep, spaced no more than six feet apart, and located within twelve inches of the ends of every sill plate segment. Calculate your bolt length carefully, factoring in the thickness of the framing lumber and the required thread exposure for washers and nuts.
Bonus Questions And Answers
Do I Need A Continuous Footing Or Can I Pour A Monolithic Slab?
While securing the perimeter is critical, understanding your required foundation type is the next logical step in structuring your build. A monolithic slab, where the floor and the load-bearing perimeter footing are poured simultaneously as one continuous piece, is highly efficient and common in warmer climates. However, the International Residential Code dictates that if your local jurisdiction experiences deep frost lines, or if the addition is carrying heavy point loads from multiple stories, you must typically pour a deep, independent continuous footing first, followed by a separate slab-on-grade inside the perimeter walls.
How Long Must The Concrete Cure Before Wall Framing Begins?
Once the final trowel passes and the concrete is poured, timing becomes your most important structural asset. While concrete achieves initial set within a few hours, it does not reach its design strength immediately. The American Concrete Institute notes that concrete generally reaches about seventy percent of its compressive strength within seven days of pouring, under normal curing conditions. While full curing takes twenty-eight days, framing can typically and safely commence after the seven-day mark. Attempting to torque the nuts on your anchor bolts prior to this can result in concrete breakout and structural failure.
Is A Bonding Agent Necessary Between The Old And New Concrete?
Beyond driving rebar dowels, ensuring a watertight and structurally sound seam between the existing home and the new addition requires proper surface preparation. Cold joints, where new wet concrete meets cured dry concrete, form natural weak points and high-risk zones for water intrusion. To mitigate shear stress failure, structural guidelines recommend mechanically roughening the face of the existing foundation to expose the aggregate. Applying a structural bonding epoxy or a cementitious bonding slurry to this roughened surface immediately before pouring the new slab ensures a monolithic bond and protects the integrity of your interior space.