RAISING AND LEVELING A GARAGE FLOOR: A COMPLETE STRUCTURAL GUIDE
Converting a garage into a livable space often requires addressing the existing concrete floor. Residential garage slabs are intentionally built lower than the adjacent home interior and engineered with a slope toward the main overhead doors to promote proper water drainage. Bridging this elevation change and leveling the surface is a critical first step in a conversion project. Choosing the right method depends entirely on the depth of the slope and the structural requirements of the finished floor.
LEVELING WITH CONCRETE AND MORTAR MIXTURES
When the elevation discrepancy is minor, utilizing cementitious products is the most effective approach. For shallow depressions or slopes requiring less than one inch of fill, a standard sand and cement mixture is highly recommended. The aggregate size in standard concrete is too large for ultra-thin applications, making it difficult to achieve a smooth finish without compromising structural integrity.
Once the depth exceeds one and a half inches, standard concrete containing pea gravel or standard aggregate becomes necessary. Using an aggregate-based concrete for deeper sections prevents cracking and provides the necessary compressive strength required for a stable foundation.
WOOD FRAMING SLEEPER SYSTEMS
For elevation changes exceeding one and a half inches, constructing a wood framing sleeper system is standard practice. This involves anchoring horizontal sill plates to the concrete slab and running floor joists perpendicular to them. Standard spacing for joists and plates is 16 inches on center, ensuring adequate support for the subfloor sheathing.
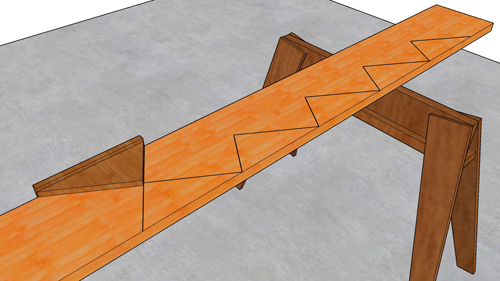
Because the concrete slab already provides foundational support, the new structural wood framing relies on accurate tapering. The lumber must be ripped or cut at an angle to counteract the slope of the slab, creating a perfectly level top surface. To optimize material costs when ripping angled sleepers, carpenters can often utilize both halves of a two-by-six or two-by-eight board, doubling the yield from a single piece of lumber.
FASTENING AND MOISTURE MITIGATION
Securing a wood sleeper system to a concrete foundation requires heavy-duty mechanical fasteners. Powder-actuated fasteners, concrete anchor bolts, or specialized construction epoxies are standard solutions. Care must be taken to countersink or notch the sleeper joists around anchor bolt heads to maintain a flush surface for the subfloor sheathing.
Moisture control is an unavoidable factor when placing wood in proximity to concrete. A distinct gap should be maintained between the exterior perimeter concrete and the new floor framing to prevent moisture wicking. For the subfloor, installing tongue-and-groove sheathing provides superior structural rigidity over standard square-edge plywood. Utilizing high-quality construction adhesive along the top of the joists prior to nailing or screwing the sheathing will prevent floor squeaks and enhance overall stability.
THREE KEY TIPS
MANDATORY TREATED LUMBER: According to the International Residential Code or IRC, any wood in direct contact with concrete or masonry must be preservative-treated. Never use standard untreated dimensional lumber for your bottom sill plates or sleepers, as concrete naturally wicks moisture that will rapidly rot untreated wood.
SECURE FASTENING SCHEDULES: When toe-nailing joists to a ledger or sill plate, avoid excessive nailing which can easily split the wood. The universal best practice is driving two nails on one side and one on the opposite side. If utilizing hardware, appropriately sized framing anchors or joist hangers provide superior uplift and shear resistance compared to toe-nailing alone.
REVERSIBILITY CONSIDERATIONS: If there is a possibility that the space will be converted back into a functioning vehicle garage in the future, avoid using heavy industrial epoxy or massive expansion anchors to secure the sill plates. These fastening methods will cause significant, permanent spalling and damage to the original concrete slab when removed.
BONUS QUESTIONS AND ANSWERS
To ensure your garage conversion meets all safety and habitability standards, it is important to look beyond just the framing mechanics. Here are three critical considerations that directly impact the success of your floor leveling project.
WHAT IS THE MINIMUM CEILING HEIGHT REQUIRED AFTER THE FLOOR IS RAISED?
Under Section R305 of the International Residential Code, habitable living spaces must have a minimum ceiling height of 7 feet. When calculating your floor framing dimensions, you must precisely measure the total thickness of your sleeper system, subfloor, and finished flooring to ensure the resulting room still meets this strict overhead clearance requirement after the floor is elevated.
DOES RAISING A GARAGE FLOOR REQUIRE A BUILDING PERMIT?
Changing the use of a space from a non-habitable garage to a habitable living area constitutes a change of occupancy classification under standard building codes. This universally requires a structural permit and subsequent inspections. While specific zoning laws vary heavily by jurisdiction, local building departments must verify that the new floor framing, insulation, egress, and electrical systems comply with residential safety standards.
What is the best way to insulate a raised garage floor?
Rigid foam board insulation (like EPS or XPS) is generally the best choice for this application. Unlike fiberglass batts, rigid foam board doesn't absorb moisture, maintains its shape, and offers a high R-value per inch. Once your sleeper joists are secured to the floor, you can cut the rigid foam boards to fit snugly into the cavities between the joists. You can seal any small gaps between the foam and the wood framing with expanding spray foam to prevent cold air drafts.
4. How do I route electrical wires and plumbing through the new floor?
Utilities must be run after the floor is framed but before the insulation and subfloor are installed. For electrical, you will need to drill holes through the center of your floor joists to run Romex wire, ensuring the holes are at least 2 inches away from the top and bottom edges of the joists to maintain structural integrity and avoid accidental nail punctures later. Plumbing requires more planning because drain pipes need a specific slope (usually 1/4 inch per foot) to drain properly. If you are running 2-inch PVC for a drain, you will likely need deeper floor joists (like 2x6s or 2x8s) to accommodate the pipe diameter and the required slope without weakening the wood.
5. How do I properly secure the wood framing to the concrete slab?
You cannot rely on gravity to hold the floor in place; it must be mechanically fastened to the slab to prevent shifting and squeaking. The most common method is using concrete anchors, such as Tapcon screws or powder-actuated fasteners. You will need a hammer drill and a masonry bit to pre-drill holes through the pressure-treated wood and into the concrete. Space the fasteners every 16 to 24 inches along each joist. Applying a bead of construction adhesive formulated for concrete and wood beneath each joist before fastening will add extra stability and help eliminate squeaks.