How To Add A Nosing To Existing Stair Treads
A stair nosing is the portion of a tread that projects beyond the face of the riser below it. Adding a nosing to a flush stairway is a common remodeling task, particularly when upgrading flooring materials or altering the aesthetic of a staircase. However, simply attaching a strip of wood to the front of a step is a structural failure waiting to happen. Understanding the physical demands placed on stairs and the proper methods for modifying them is critical for safety and longevity.
The Structural Challenge Of Stair Nosings
When ascending or descending a staircase, foot traffic does not land flat in the center of the tread. A significant amount of body weight and downward pressure is concentrated directly on the front edge, or the nosing, of the step. If an extension is added without proper structural support, the front edge effectively becomes a lever. Over time, the repeated pressure will break the added nosing off, creating a severe tripping hazard.
Flimsy materials exacerbate this issue. Composite materials like particleboard lack the internal tensile strength to support this overhanging load. Only solid structural materials, such as minimum three-quarter-inch plywood, oriented strand board, or solid hardwoods and softwoods, should be used for stair treads.
Method One: Replacing The Entire Tread
The most structurally sound and reliable method for adding a nosing is to remove the existing flush tread completely and replace it with a new, deeper tread. This eliminates any weak seams or joints at the front of the step. By using a single piece of solid material, the nosing becomes an integrated, continuous part of the tread, easily handling the concentrated loads of daily foot traffic.
Method Two: Partial Tread Replacement With Structural Blocking
If replacing the entire tread is not feasible, usually because the staircase is tightly wedged between two walls, a partial replacement can be performed. This involves cutting away the front section of the existing tread and installing a wider front piece to create the nosing.
Because this method introduces a seam running parallel to the stringers, that seam becomes a weak point. To reinforce it, structural wood blocking must be installed beneath the seam, wedged securely between the stair stringers.
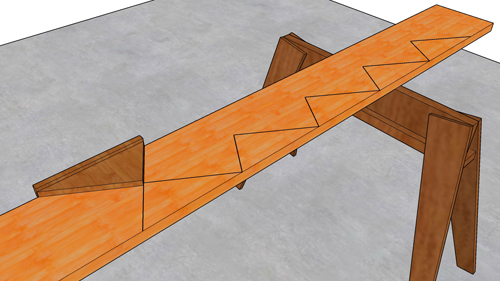
For added strength, the cut joining the old tread and the new front piece can be angled. If the new nosing piece is cut with a backward-facing angle underneath, stepping on the front edge will force the back edge up against the angled cut of the original tread, effectively locking it in place and resisting uplift. If the angle is cut in the opposite direction, stepping on the nose will cause the joint to lift and separate.
Method Three: Biscuit Joinery Or Dowels
Another alternative is to attach a solid wood nosing directly to the front of the existing flush tread using heavy-duty wood dowels or a biscuit joiner. Holes must be drilled with absolute precision into both the existing tread and the new nosing piece. Combined with high-strength wood glue, this creates a hidden, reinforced joint.
While better than simply face-nailing a strip of wood, this method still relies entirely on the shear strength of the dowels or biscuits to resist the downward leverage placed on the nosing. It is generally recommended only for low-traffic stairways.
Maintaining Consistent Stairway Dimensions
A critical rule in stair construction is uniformity. If you decide to add a nosing or alter the tread depth, you must apply the exact same modification to every single step in the flight. Modifying only the top or bottom step alters the stride pattern. Building codes strictly regulate the maximum allowed variation in tread depth within a single flight of stairs to prevent fall injuries.
Three Key Tips For Stair Nosing Modification
Never face-nail or screw a thin strip of wood to the front of a tread to create a nosing, as it lacks the surface area and structural integrity to withstand foot traffic.
Avoid particleboard entirely for stair treads and nosings; always use solid lumber, high-quality plywood, or oriented strand board for structural weight-bearing steps.
If you must cut an existing tread to piece in a larger nosing, always install structural wood blocking underneath the new seam, securing the blocks between the existing stair stringers.
Bonus Structural And Code Considerations
To further expand on stair construction and ensure your staircase project meets the highest safety standards, it is important to understand a few exact code regulations.
What Is The Minimum And Maximum Allowed Nosing Projection According To The International Residential Code?
According to standard residential building codes, a stair nosing must project a minimum of three-quarters of an inch and a maximum of one and one-quarter inches beyond the riser. This exact measurement ensures there is enough overhang to provide a safe landing space for the heel when descending, without creating a toe-catching trip hazard when ascending.
Are Stair Nosings Always Required On Every Type Of Staircase?
No, nosings are not universally required. Building codes state that a nosing projection is not necessary if the total depth of the stair tread is eleven inches or greater. An eleven-inch tread provides adequate surface area for the foot to land safely without the need for an additional overhang.
How Does The Building Code Address The Shape Or Curve On The Front Edge Of A Stair Nosing?
To prevent slips and ensure a predictable stepping surface, building codes limit how round the front edge of a stair can be. The maximum allowable radius of curvature at the leading edge of the tread is nine-sixteenths of an inch. Anything rounder than this can cause a foot to slip off the edge, especially when wearing smooth-soled shoes or socks.