Optimizing Construction Sequences: Installing Plywood Siding Before Roof Trusses
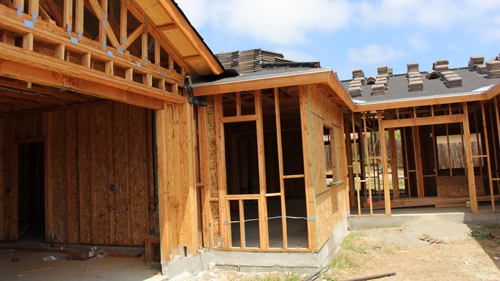
When planning a construction project, the sequence of assembly dictates not only the efficiency of the build but also the structural integrity and aesthetic finish of the structure. A common framing scenario involves attaching roof trusses using face-mount hangers against a vertical wall assembly, rather than resting them on a top plate. In these specific flush-framed instances, a strategic approach to the exterior sheathing sequence can save significant labor and prevent unnecessary structural complications.
The Structural And Aesthetic Advantages Of Sequencing
Instead of framing the wall structure, hanging the trusses, and subsequently attempting to sheathe the exterior, the most effective method is to install the plywood siding or structural sheathing completely before attaching the roof trusses. Securing continuous sheets of plywood directly to the wall studs establishes an unbroken structural shear wall. This uninterrupted wooden diaphragm is essential for resisting lateral loads such as high winds or seismic activity, aligning with established building code requirements for wall bracing and lateral stability.
Attempting to install siding after the trusses are already hung creates a logistical and structural nightmare. Carpenters would be forced to painstakingly measure, cut, and fit individual segments of plywood around each truss profile. This piecemeal approach not only consumes massive amounts of expensive labor but also compromises the weather-resistant barrier of the building envelope. Every unnecessary cut and seam introduces a potential entry point for moisture and drafts, requiring excessive structural blocking, flashing, and trim work to remedy.
Advanced Project Planning And Efficiency
The core takeaway for any construction professional or builder is the immense value of pre-construction planning. By finalizing the exterior wall surface first, the subsequent installation of metal truss hangers and the wooden trusses themselves becomes a highly streamlined process. The structural hangers can be mounted directly over the plywood siding into the solid framing behind it, provided that the engineered fastening requirements are strictly followed.
This sequencing method guarantees a cleaner exterior appearance with no unsightly gaps, eliminates the need for complex custom cuts, and dramatically accelerates the framing schedule. Properly sequencing your build reduces physical burden, mitigates on-site errors, and ultimately delivers a more resilient, weather-tight building envelope.
Three Key Tips For Siding And Truss Installation
Install Sheathing For Continuous Shear Strength: Always prioritize continuous sheathing panels over piecemeal installations. According to standard residential building codes, unbroken structural panels provide superior shear strength. Cutting sheathing around framing members destroys this continuity and requires extensive solid blocking at every joint to restore structural compliance.
Verify Fastener Length For Hangers Over Sheathing: If you are attaching face-mount truss hangers over plywood siding, you cannot use standard length hanger nails. You must increase the fastener length by the exact thickness of the sheathing to ensure the nails achieve the required penetration depth into the solid wood header or studs behind the plywood.
Map Out Truss Layouts On The Sheathing: Before installing any metal hangers, snap chalk lines and mark your exact truss layout directly onto the installed plywood siding. This ensures perfect spacing, prevents cumulative measuring errors down the wall line, and allows you to verify that hangers are landing accurately on structural backing.
To prevent chalk from bleeding through the final finish, stretch a plain string and mark the hanger locations with a pencil.
Frequently Asked Questions About Truss And Sheathing Sequences
Beyond the basic sequence of sheathing and truss installation, builders often encounter deeper technical challenges that require strict adherence to building science and engineering codes.
Question: Can Truss Hangers Be Installed Directly Over Plywood Sheathing?
Answer: Yes, face-mount hangers can be installed over wood structural panels like plywood or oriented strand board, but strict fastening rules apply. The International Building Code requires that the structural load be transferred adequately to the load-bearing framing members. Therefore, the fasteners used for the hangers must be increased in length by the thickness of the sheathing. For example, if a hanger manufacturer specifies a one and a half inch nail for direct-to-wood installation, adding half-inch plywood requires a two-inch nail to achieve the engineered penetration depth into the solid header behind the siding.
Question: How Does Cutting Plywood Around Trusses Affect Shear Wall Performance?
Answer: Cutting sheathing around penetrating members destroys the continuous load path of the shear wall diaphragm. According to the International Residential Code, braced wall panels must be continuously sheathed from the bottom plate to the top plate to properly function. If a continuous panel is notched or cut into smaller pieces to fit between trusses, it loses its ability to effectively transfer lateral shear forces. To restore this structural capacity, a builder would have to install engineered solid wood blocking and specialized nailing patterns at every single seam, which is highly inefficient and prone to failure if executed improperly.
Question: Should A Weather Resistant Barrier Be Applied Before Or After Installing The Trusses?
Answer: If the building design features flush framing with hangers against a wall, the weather-resistant barrier, such as a polymeric house wrap, should ideally be installed over the plywood sheathing before the trusses and hangers are attached. Building science dictates that the building envelope must shed water downwards and outwards. By wrapping the continuous sheathing first, you create an unbroken drainage plane. Hangers and their fasteners then penetrate this plane, but they can be individually flashed or sealed with approved structural sealants to prevent moisture intrusion into the wall cavity, maintaining a superior building envelope.