INTRODUCTION TO SMALL HOME FOUNDATIONS AND ROUGH-IN PLUMBING
Building a small home requires careful spatial planning and precise execution, especially when combining the structural foundation and the under-slab drainage system into a single phase of construction. For a compact footprint, such as a 340-square-foot layout, coordinating the rough-in plumbing directly with the excavation, steel reinforcement, and formwork ensures structural integrity while preventing costly layout mistakes. Understanding how these elements interact is the key to passing your first major building inspection.
SETTING FOUNDATION FORMS AND EXCAVATING FOOTINGS
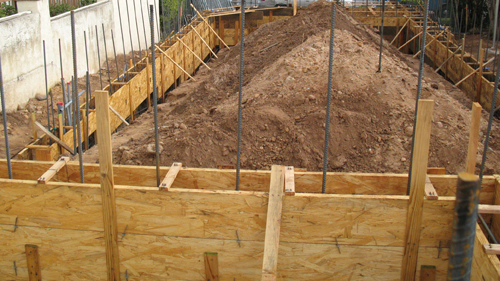
The structural perimeter of the building begins with the installation of solid formwork. Using two-by-twelve lumber for the perimeter forms establishes a clean boundary for the concrete pour. Accompanying these forms are the perimeter footings, which must be excavated twelve inches wide and twelve inches deep to meet minimum residential bearing standards for lightweight structures. Wood or metal stakes are driven outside the formwork to securely hold the boards against the immense lateral pressure of wet concrete, ensuring the outer walls remain perfectly straight and plumb.
STRATEGIC UNDER-SLAB PLUMBING DESIGN
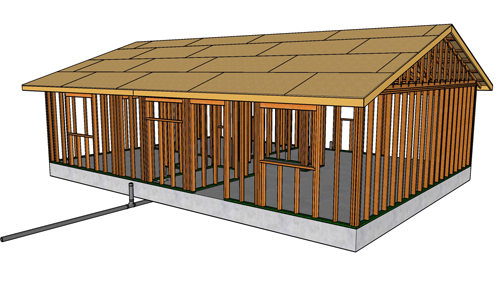
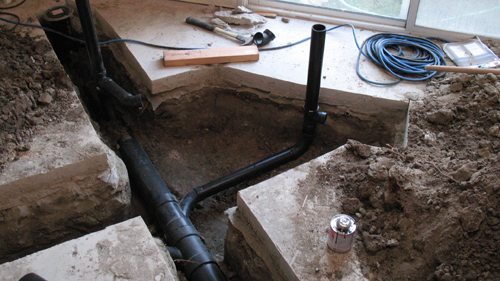
Roughing in DWV (drain, waste, and vent) plumbing beneath a concrete slab requires a layout that minimizes clogging risks and maintains structural safety. A smart approach is to run the main three-inch waste line at a gentle twenty-two-and-a-half-degree angle rather than sharp turns. This allows for a straight-line cleanout fitting at the exterior edge, making it incredibly easy to clear any future blockages with a plumbing snake.
To ensure optimal flow velocity, specific pipe sizes are matched to individual fixtures. The laundry washing machine utilizes a two-inch line, while the kitchen sink drops from an inch-and-a-half pipe into a two-inch pipe using a combination wye fitting. Where these lines must transition vertically up into the walls, long-turn ninety-degree sweeps should always be used underneath the slab rather than tight short-radius elbows, drastically reducing friction and catching points.
Furthermore, trenching for plumbing should keep a safe distance away from the perimeter footings. Digging trenches too close to the interior edge of a footing can cause the soil underneath to cave in, compromising the structural bearing capacity of the foundation. Bringing the plumbing lines further into the interior slab area before branching out helps protect the integrity of these deep concrete footings.
UNDERSTANDING VENTING AND THE BATHROOM LAYOUT
The bathroom layout groups the highest-volume fixtures together, connecting the toilet, bathtub, and sink back to the main line. Proper venting is critical to maintain the water traps that prevent sewer gases from entering the home. By utilizing a wet venting system, where the oversized bathroom sink drain also acts as the vent for the toilet and tub, you can eliminate excessive vertical pipe runs through the roof. Per standard plumbing practice, a three-inch waste line offers a generous distance allowance before it absolutely must tie into a vertical vent stack. However, if local codes require individual venting, additional wye fittings can easily be cut into the horizontal lines to run dedicated vent pipes up through the interior wall framing.
STEEL REINFORCEMENT PROTOCOLS
Once the plumbing lines are tested and the trenches are backfilled with an approved, well-compacted fill material, it is time to install the structural steel. The footings are reinforced with half-inch, or number four, rebar running continuously around the perimeter. To create a continuous structural loop, any splices between rebar sections must feature a lap length of at least twenty inches, though twenty-two inches provides an excellent safety margin. Using standard twenty-foot rebar lengths minimizes the total number of splices needed. This perimeter steel should be suspended to sit three to four inches away from both the top and the bottom surfaces of the concrete.
For the main living area slab, a grid of number four rebar is tied throughout the entire floor space. A spacing of twenty-four inches on center in both directions provides solid reinforcement, though tighter configurations like sixteen inches on center are frequently used for increased load distribution. When plumbing boxes or tub blockouts interrupt the grid, the cross-cutting rebar must be cut and repositioned tightly to either side of the obstruction to maintain total steel continuity across the slab.
ANCHOR BOLTS AND FINAL POUR PREPARATION
The physical connection between the concrete foundation and the wood-framed walls depends entirely on half-inch anchor bolts. These bolts must be placed a maximum of six feet apart along the entire perimeter and embedded at least seven inches deep into the concrete. Crucially, building codes dictate that an anchor bolt must be located within twelve inches of the end of any bottom wall plate break and within twelve inches of every corner. This prevents the wood framing from lifting or shifting under wind or seismic loads. With forms braced, plumbing pressured, rebar tied, and anchor bolts staged, the site is officially ready for a building inspection prior to pouring the concrete.
CONCLUSION
Integrating your foundation and underground utilities takes careful coordination, but getting it right sets the stage for a smooth framing phase. Once the concrete cures and the perimeter form boards are stripped away, you are left with a perfectly level, structurally reinforced platform ready for the walls to go up.
THREE KEY PLUMBING AND FOUNDATION TIPS
Protect Slab Integrity With Long Sweeps: Always use long-turn ninety-degree sweeps for all horizontal-to-vertical plumbing transitions beneath a concrete slab. Short-radius elbows create high-friction zones that catch debris and lead to underground clogs that are highly destructive to repair.
Secure Rebar Lap Splices: Ensure all structural number four rebar overlaps by at least twenty to twenty-two inches at every joint. Insufficient lap lengths prevent proper tension transfer through the steel, which can lead to severe structural cracking under the weight of the building.
Anchor Near Plate Breaks: Always install an anchor bolt within twelve inches of every corner and every single break in the wood bottom plate. Even if your overall bolt spacing is well under the six-foot maximum, failing to secure the ends of individual wall plates violates code and leaves weak points in the structural framing.
BONUS QUESTIONS AND ANSWERS
Moving beyond the basic setup of the foundation, managing code compliance and material protection requires a closer look at structural guidelines. Here are three critical industry questions regarding under-slab systems.
Question: What is the minimum required concrete coverage for reinforcing steel placed inside foundation footings?
Answer: According to Section R402.2 of the International Residential Code and ACI 318 standards, rebar that is permanently exposed to earth, such as steel inside a footing poured directly against the ground, must have a minimum of three inches of concrete cover. This thick layer of concrete acts as a vital protective barrier, shielding the steel from groundwater penetration, rust, and eventual structural failure.
Question: What is the mandatory minimum slope required for under-slab drainage and waste piping?
Answer: The International Residential Code requires that horizontal drainage piping with a diameter of two inches or less must be installed with a minimum downward slope of one-quarter inch per foot toward the sewer main. For larger three-inch pipes, a slope of one-eighth inch per foot is technically permitted by code, but maintaining a consistent one-quarter inch slope remains the industry best practice to guarantee that both liquid and solid waste flow efficiently without settling.
Question: How must plumbing pipes be protected when passing directly through a poured concrete foundation wall or footing?
Answer: International Residential Code Section P2603.3 states that any plumbing pipe passing through concrete or masonry must be protected by a cylindrical sleeve or wrapped in a thick, compressible material like closed-cell foam insulation. This wrapping must provide at least one-quarter inch of clearance around the pipe, preventing the abrasive, highly alkaline concrete from corroding the pipe material or shearing it apart during natural building settlement and thermal expansion.